Just like any real student I have once again taken an age (2 months) to get around to a deadline, or in this case, my previous comment dedicating me to providing more regular posts!
Apologies for the delay, the reason for this is two-fold:
- Believe it or not a lot of progress has been made, however as a lot of it wasn’t directly related to the drone, more related to some Java stuff I wanted to keep the bulk of that for later on.
- I am apparently terrible at writing blog posts regularly.
Provided you’ve forgiven me, I’ll move on, back into the world of drones as well as some work I’ve been doing away from drones on image comparison programming in Java, I’ll make a separate post (or posts) regarding this in detail, but will stick to the drone stuff and high-level image work for now.
Now, due to this all being a part of my Final Year Project (FYP, major dissertation-based project) at Brunel, I am very cautious of posting code up here until the submission deadline has passed and I have my degree in my hand. This is just to cover me from all angles as this is a BIG part of my degree! Boring bit aside, let’s get into it…
In the last post (Brave New World…) I’d managed to get the fantastic, open-source WebFlight application working on the laptop, therefore enabling the drone to fly around based on keyboard inputs while outputting a live feed to a browser window (Google Chrome in my case), however I needed to get my hands on those images for analysis.
Storing images to the laptop
This project is about collecting images from the drone and messing around with them on the laptop, so to do this I fiddled around with the WebFlight code and managed to get images saved to a local directory on my laptop during flight. Again, I’ll provide code and guidance to completing this in the coming months, for now you’ll have to take my word on it!
The images were stored to a local folder every few seconds while the drone was in flight. The result is shown below:
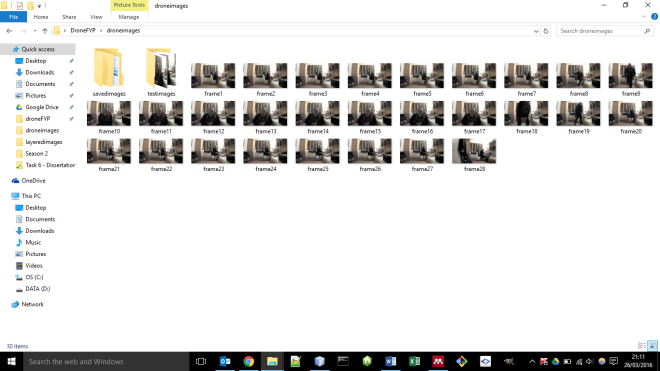
Each image was stored in numbered order so the user can make sense of them as a series and easily choose which ones they would like to compare. In the example of the above, these are images of me wandering towards the drone, making a few faces and then moseying off.
Comparing images with Java
Moving on from this point, the next goal was to see about comparing the images for differences using Java. In the scope of this post (and because it’s quite code-heavy) I won’t go into detail about how this was achieved for now. What I have done however is provided a few output images based on two of the images in the folder shown in the above screenshot.
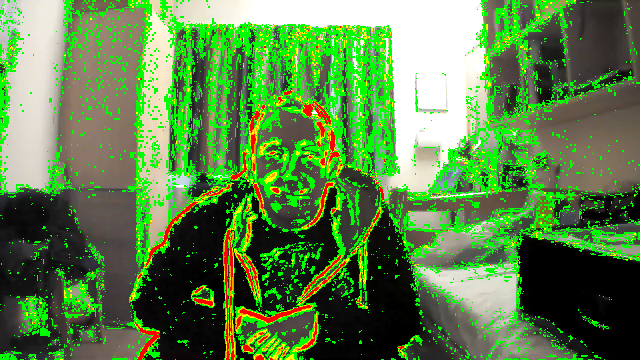
The first image-based output used a single level of tolerance (and therefore a single colour) to show the differences between two images, as shown below in yellow:

Moving on from this, by creating multiple “levels” of change tolerance values, it was possible to assign various levels of change in a single output that gave a surprisingly pleasing and psychedelic (ish) output. Green indicates a very minor change, yellow slightly less minor, orange a bit more of a change and red picks out changes that are severe.
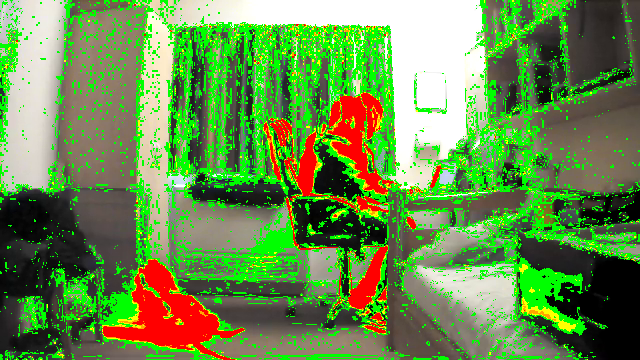
The second of the two heat-map style outputs involved taking a picture from the drone, then getting up, moving the backpack out of frame and then sitting down again.Gripping stuff, I know. But the output looks fantastic. While taking all of the above images the drone was completely stationary (landed) on a solid surface, not in flight. The reason for this is it’s simply too unstable even hovering in an empty room to get two images from the same angle for comparison.
The point of all of this fancy stuff is to deploy it in the real world to see if damage to an object or structure has changed over a period of time (before and after spot the difference), and in doing so, doing it programatically, with greater precision than the human eye. The idea was to provide an output that enabled a user to very quickly and accurately identify differences between two images.
How does it work?
On a very high-level, here’s what the program I created does to achieve this:
- Takes in two images
- Checks they’re both the same size (stops here if they’re not)
- Goes through the first image pixel-by-pixel and compares the Red, Green and Blue (RGB) values of each pixel to the same pixel in the second image
- A new blank image is constructed of the same dimensions of the original images
- Wherever there is a difference between the two images under comparison (according to each tolerance value), the pixel in the new image is changed to either bright green. orange. yellow or red, otherwise the “alpha” (transparency) value is used to make the pixel transparent on the new image.
- New image is saved in a specific folder locally, this image is now treated as a “mask”
- The mask is then overlaid on top of the second of the original images up for comparison and saved as yet another new image
- This final new image is what you see in the outputs above. All changes are highlighted on the original image for easy viewing.
So there we go, we’ve taken images from the drone, compared them pixel by pixel and outputted something that can be used to quickly identify areas of major change.
Current/future work
When it comes to this being deployed in the real world, it faces a couple of issues at the moment, a few of which I’m working on fixing:
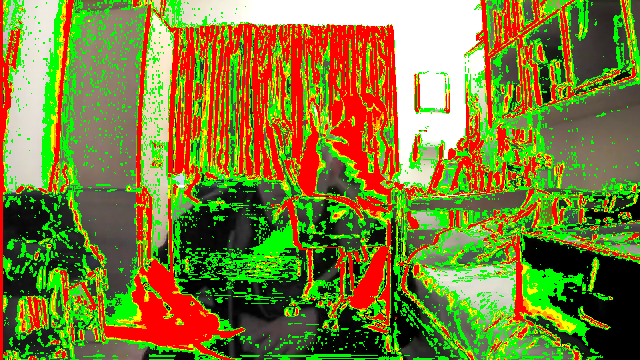
- If the images aren’t taken from exactly the same position and angle the output is unbelievably screwed at the moment. Below I’ve simply shifted the image to the right by 3px for comparison, as you can see there is a LOT of additional noise
This could be mitigated for by going all “Inception” on it. By this I mean searching for an image, within an image, according to a point of interest, a certain pattern of pixels for example then using this to represent the pixel co-ordinate, copy out a certain sized area of the image using the co-ordinate gained as a corner.
Another way of mitigating against this is to ensure the drone checks the pixels in view through its camera as it flies around and automatically correcting its pitch, roll and yaw to get to the exact position that a previous image was taken at. However this option would take a lot of live processing resources to achieve and based on playing with the Parrot AR2.0, it’s a little unstable to fine-tune it’s location to the level of precision required.
- As also noticeable in the above outputs, even the slightest change in lighting is highlighted as a change, albeit green – therefore slight, this adds a lot of noise to the image, distracting the user from the main points of interest.
This is currently being worked on, in that I’ve implemented varying level of tolerances to highlight the level that something has changed on the output (final) image.
- Hard-coded tolerance values
As these values have been built in throughout the development process, they’re not dynamic to the users’ possible needs at the minute. The user interface could be improved to include options for the user to play with the tolerance values, maybe even showing changes of a certain tolerance only (singular, modifiable tolerance value). As my dissertation is based on providing a technical solution rather than a fancy user interface, for now this has been set aside. For the future this is a necessary consideration to take the work forward.
Overall…
So aside from failing to post my progress up on here for 2 months, things are going fairly well. It’s getting a bit more into the wordy side of things though as I’ve been typing my dissertation up on all the work done to date relentlessly, so forgive me again but I’ve tried to add some more media in where I can 🙂
In the scope of my dissertation this is more or less all that I’ll be doing in terms of building the application itself, unfortunately I’ve run out of time to play with LiDAR and the like but I may well revisit this idea one day. What I will be doing from here on regarding this inaugural project however, is writing posts when I get some time on how exactly it was all done (coded) so anyone out there can replicate and play with the ideas I’ve enjoyed working with. Throughout the development process I’ve maintained a private Git repository which I will aim to make public as soon as I’m hoofed back into the real world after graduating this summer, so that should also help.
As always, please let me know if you have any questions or if you have any feedback, writing these posts has been an enjoyable side-project so far on top of the dissertation so please keep all the input coming!
