![How to: Interact with your Raspberry Pi by hostname rather than IP address [Windows, MacOS, Linux]](https://mveeprojects.files.wordpress.com/2019/06/headerwinpi-1.png?w=760&h=300&crop=1)
This is a short post which intends to do exactly what it says on the tin, we want to access a Raspberry Pi (RPi) on our local network without having to remember its IP address every time!
The solution I will be outlining here will be very simple, the bulk of it will be based on doing it on a Windows 10 machine (see 2.a.), however I have added a section on how to complete the same process on Linux or MacOS machines as well (see 2.b.).
In the future I might dip into the idea of running a local open-source DNS server (dnsmasq or similar) and writing a post about that as well, but for now I just want to keep it super simple as this will be more than enough for most enthusiasts or beginners getting stuck into working with their RPis!
Why would we want to do this?
By this point you might think this is obvious, however to make sure we’re totally clear I would like to illustrate it a little bit. Using the example of the Jenkins CI server we created in an earlier post, you can see that on the left we are using the IP address given to the RPi, and on the right we are using the hostname of the RPi.


Personally, I’m not a fan of remembering 4 dot-separated numbers, in fact, I’m pretty sure I’d almost instantly forget the IP address! Whereas if we used a hostname, this might be much more memorable – as long as the chosen hostname makes sense! In the example above it has been named to directly reflect the server/machine that it relates to, I think you’ll agree that this is much easier for human beings to remember.
How do we do it?
1. Figure out your RPis IP address
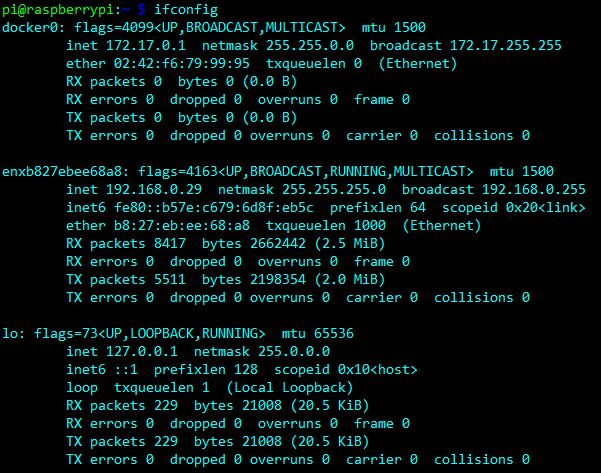
Just in case you haven’t seen this so far I’ll quickly go over the method to retrieve the RPis IP address – while using the RPis terminal window, type the following command and press enter.
ifconfig
This should output something similar to the below. What you’re looking for is the IP (inet) address that starts with “192.168…” as this is the private local network IP address (only accessible from within your local network), in the example below it is 192.168.0.29.
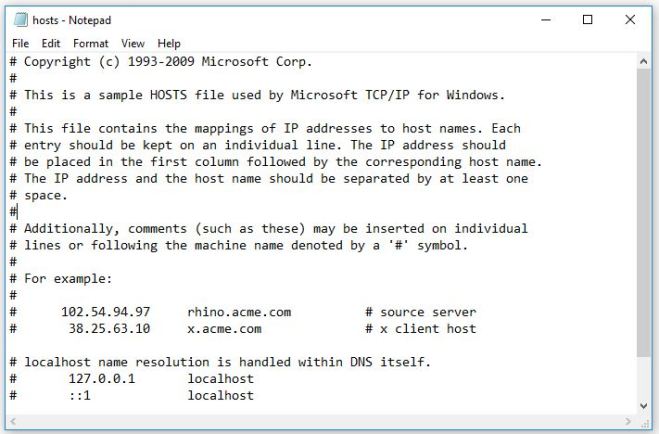
2.a. Modify the hosts file (Windows 10)
As per the instructions in this useful guide, we need to run notepad as an administrator (right click notepad and choose “run as administrator”) and then open C:\Windows\System32\drivers\etc\hosts. The hosts file should look similar to the below:
All we need to do now is add a line at the bottom that states the IP address of the RPi followed by the desired hostname as shown below. Don’t worry too much about the number of spaces between the IP and hostname, I put 4 spaces between just out of habit but it doesn’t really matter, you can just use 1 space if you want.
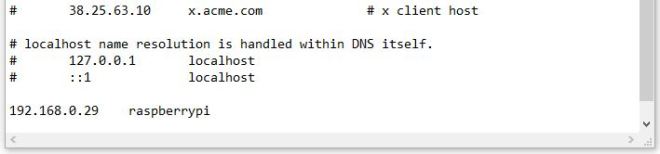
Save the hosts file, and that’s it! You can now replace any usages of the RPis IP address and replace them with the hostname you assigned to it from the Windows machine you’re currently using. This includes not only usages via HTTP etc, but it’s also useful for SSH access if you’d prefer to work with your RPi headlessly (without a dedicated monitor, keyboard and mouse attached to it).
2.b. Modify the hosts file (MacOS/Linux)
The process for doing this on Mac or Linux machines is very much the same, however the location of the hosts file is different and you’ll likely have a different editor available to modify it.
Personally, I prefer to use the terminal to quickly make small changes to root-level files in Mac/Linux and I either use vim/vi or nano editors which are generally speaking built into most flavours of these UNIX OSs. To open the hosts file use either one of the commands below depending on your preference, add your IP and desired hostname in the same way as shown above for Windows and then simply save and close the file when you’re done.
sudo vi /etc/hosts
sudo nano /etc/hosts
That’s all for now
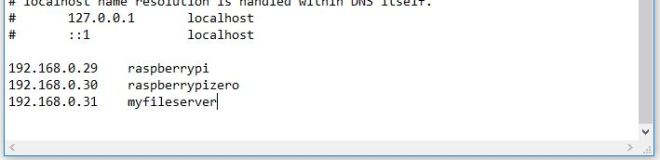
Although a short and simple post, it’s hopefully a useful one to anyone who (like me) gets fed up of repeatedly entering IP addresses when working with their RPis. Hopefully you can see the benefit, especially if you have several RPis, or in fact any other machines on your local network that you would like to connect to more easily. All you need to do is add an additional line in the hosts file per machine as shown below.
As mentioned at the start, this is a basic solution and as mentioned at the latter end of the post, it will only work for the machines that you have manually edited the hosts file on. For this reason, a more sophisticated approach such as a centralised local DNS server would be more appropriate (and interesting!) if you have several locally connected devices that you would like to interact with from several different local machines. That might well be the topic of another post to come!
Thanks for reading,
Mark
